How to upgrade Horizon Workspace 1.0 to 1.5

Since a new version of Horizon Workspace came out I’ve been curious about differences and improvements, so i upgraded it to version 1.5.

I have to say that, besides some differences here and there in the look and feel and the new functionality to manage VMware Ready Android devices, I have already found a nice improvement in the way you mount the NFS store in the data-va because finally the procedure simply works and there’s no need of crazy workarounds. I also suspect that they improved a lot the way you change self-signed certificates compared to what it used to be; more on this when i will have tested it.

Note: You can only upgrade if you have completed the setup procedure and you have a fully functional environment.

All commands need to be run from the configurator-va, just as usual, so let’s SSH into it, then:

su -
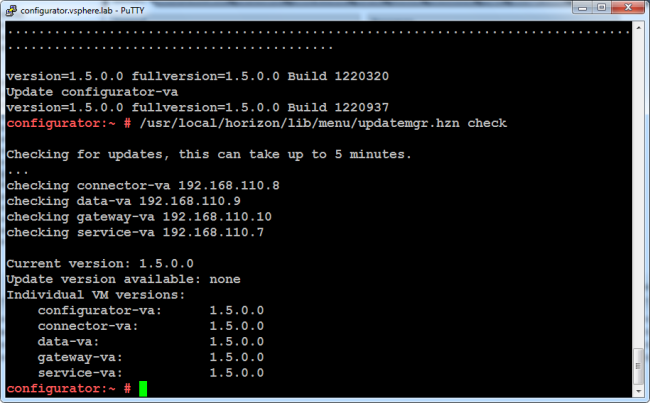
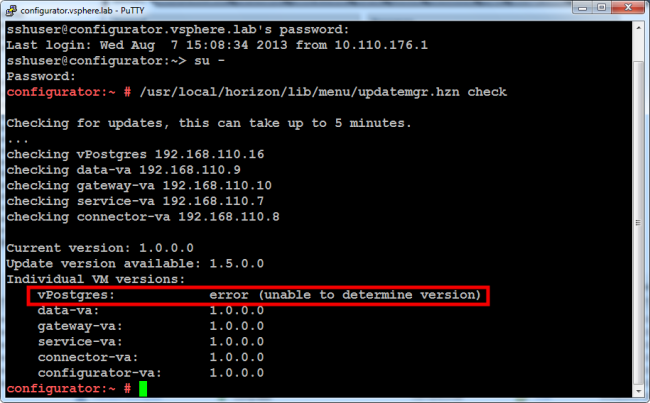
/usr/local/horizon/lib/menu/updatemgr.hzn check

You should get this output:

Image

As you can see it won’t recognize my vPostgres and this is normal. Since I’ve started this series of posts about Horizon Workspace installing the external database on vPostgres i also added the VM to the VApp to make sure it starts for first and stop for last. The first time i tried to upgrade i decided to ignore this error and went ahead with the upgrade which failed and left my Horizon Workspace installation in an unusable state so i reverted the snapshots, removed the vPostgres from the VApp and rerun the command and i could see no issue at that point.

Before going on and since it’s been so useful for me, i will show you how to snapshot all your VMs in the VApp at once so you can revert if you need. Since you might have more than just 5 VMs i like to use PowerCLI to take over this kind of task simply because it’s faster than working around the GUI:

Get-VApp Horizon-Workspace | Get-VM | New-Snapshot -Name "UpgradeHorizon" -Description "Horizon Workspace upgrade from version 1.0 to 1.5" -Memory -Quiesce -Confirm:$false -RunAsync

Given that you didn’t change the default name of the VApp (Horizon-Workspace) this will snapshot all the VMs included in it.

In the vSphere client you should see this:

Image

Once they are all completed we can go back to the configurator-va and start the upgrade with peace of mind:

/usr/local/horizon/lib/menu/updatemgr.hzn update

Now you should see a whole lot of downloading and installing. In my lab it took about 40 minutes for the whole procedure.

When the upgrade is done you have to shutdown and restart the VApp; since i still have the PowerCLI open i used it:

Stop-VApp -VApp Horizon-Workspace -Confirm:$false
Start-VApp -VApp Horizon-Workspace -Confirm:$false

You shouldn’t start it again until it’s stopped, so in order to see the status of the command i’ve omitted “RunAsync”.

Now check that your Horizon Workspace environment still works then you can check again for updates to see the current status:

Image

That looks al good, now you just have to remember to update your preview binaries in the data-va if you used the LibreOffice preview because there’s a new version, just do as usual.

If you’re happy with the result you can remove the snapshots we created earlier:

Get-VApp Horizon-Workspace | Get-VM | Get-SnapShot | Where { $_.Name.Contains("ToolsUpgrade") } | Remove-Snapshot -RemoveChildren -Confirm:$false -RunAsync

In my case i also had to put back the vPostgres VM in the VApp.

That’s pretty much it.

DISCLAIMER: PowerCLI is a powerful tool and should not be used to throw in some commands without understanding the effects. Before running PowerCLI commands in your production environment always test them and adjust them for your situation. I take no responsibility if you don’t test things out yourself first and your Horizon Workspace gets broken.

UPDATE: In the release notes it is clearly stated that in the documentation there are missing steps in case you have multiple service-va VMs. Please refer to the Horizon Workspace 1.5 release notes for the additional steps.

Configuring redundancy for Horizon Workspace Virtual Machines aka How To Scale Horizon Workspace

Horizon Workspace can scale to many thousands of users, but obviously you are going to need more than just the mere default setup with 5 virtual machines if you want to get there.

As an example let’s take VMware own internal implementation for 13.000+ users so we can see how does Horizon Workspace scale:

  • 1x Configurator VA is used. 2vCPU, 2G Memory
  • 6x Connector VA is used. 2 vCPU, 4G Memory
  • 4x Gateway VA is used: 2 vCPU, 8G Memory
  • 2x Service VA is used: 2vCPU, 6G Memory (1 for HA)
  • 11x Data VA is used: 6 vCPU, 32G Memory
  • 2x Postgres Server is used: 4 vCPU, 4G Memory (1 for replication)
  • 3x MS Office Preview Server: 4vCPU, 4G Memory
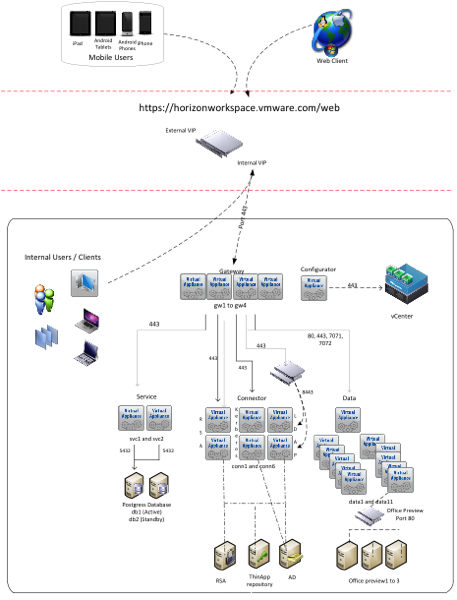
VMware Architectural Diagram

As you can see most components can scale to many units, except the configurator-va. The configurator-va is a single point of administration when it comes to configuring your Horizon Workspace environment and it cannot be redundant.

Note: If you intend to increase the capacity of your Horizon Workspace virtual machines don’t forget to adjust the java heap size for improved performance.

In order to add a new virtual machine of any type, you must log in to the configurator-va virtual machine as root user and run the following command:

hznAdminTool addvm –type="VMType" --ip="new VM ip address"


This command can be executed only after the Horizon Workspace setup has been fully completed and you have tested that the solution is working.

The new virtual machines will have to follow the same requirements regarding IP addresses as the base virtual machines. For an overview of these requirements check “How to install Horizon Workspace using an external database”.

For Connector and Data virtual machines, this command creates the new virtual machine by cloning a base snapshot of the original virtual machine of the same type. The base snapshot is captured for all virtual machines during the initial deployment. The command fails if the base snapshot does not exist.

For service and gateway virtual machines, this command creates the new virtual machine by cloning the current virtual machine snapshot.

Let’s dig into details about having multiple instance of each type of virtual machine.

Note: The following commands, unless specified otherwise, must be executed on the configurator-va.

Multiple gateway-va
Companies can deploy multiple gateway-va in order to distribute load on more than one virtual machine thus providing both redundancy and scalability for this role. This is usually the first role that you want to make redundant since it’s the entry point for all users.

The specific command to add a gateway-va is as follows:

hznAdminTool addvm –type=GATEWAY --ip="new VM ip address"


Multiple service-va
You might want to add another service-va for the same reasons of the gateway-va.

Note: In order to add more service-va you must be using and external database.

The specific command to add a service-va is as follows:

hznAdminTool addvm –type=APPLICATION_MANAGER -- ip="new VM ip address"


Now connect to https://ConfiguratorHostname, open the System Information page and note how both the old and new service-va are listed and also how the new service-va is in maintenance mode. Before proceeding verify that the virtual machine was added correctly by checking the IP address.

We are going to need to open some firewall ports on all service-va, as referral for the coming configs use these:

iptables -A INPUT -i eth0 -s "OTHER_service_va_IP" -p tcp --dport
9300:9400 -m state --state NEW,ESTABLISHED -j ACCEPT
iptables -A OUTPUT -o eth0 -s "OTHER_service_va_IP" -p tcp --sport
9300:9400 -m state --state ESTABLISHED -j ACCEPT
iptables -A INPUT -i eth0 -s "OTHER_service_va_IP" -p udp --dport
54328 -m state --state NEW,ESTABLISHED -j ACCEPT
iptables -A OUTPUT -o eth0 -s "OTHER_service_va_IP" -p udp --sport
54328 -m state --state ESTABLISHED -j ACCEPT

Now we need to do the following to open firewall ports:

  • Run hznAdminTool listvms command to list service-va virtual machines.
  • Write down only the service-va virtual machine IP addresses.
  • Log in to the service-va virtual machine for IP address1 as root and go to the console.
  • Run the iptables command and use IP address2 as the value for the “OTHER_service_va_IP” parameter.
  • Log in to the service-va virtual machine for IP address2 as root and go to the console.
  • Run the iptables command and use IP address1 as the value for the “OTHER_service_va_IP” parameter value.

Next we need to run the following commands on all service-va:

service elasticsearch stop
hznAdminTool configureElasticSearch -ES_MULTICAST_ENABLED true service elasticsearch start
service elasticsearch status


And run the following commands only on the new service-va:

service rabbitmq-server stop
service elasticsearch stop
rm /var/run/rabbitmq/pid
rm /var/run/rabbitmq/lock
rm /var/run/elasticsearch/elasticsearch.pid
rm /var/lock/subsys/elasticsearch
rm -R /db/rabbitmq/data/*
rm -R /db/elasticsearch/*
service rabbitmq-server start
service rabbitmq-server status
rabbitmqctl stop_app
rabbitmqctl force_reset
rabbitmqctl start_app
hznAdminTool configureElasticSearch -ES_MULTICAST_ENABLED true service elasticsearch start
service elasticsearch status

Finally go to https://ConfiguratorHostname/cfg and click “Exit Maintenance Mode” on the newly added service-va. The Configurator updates all the gateway-va virtual machines and starts sending requests to the new
service-va virtual machine as well.

Multiple connector-va
Creating multiple connector-va will allow you to reduce traffic and reduce downtime. Other than that, creating multiple connector-va will enable you to use multiple means of authentication such as Active Directory user and password, RSA SecurID passcode or Kerberos-based Windows authentication. To enable multiple forms of authentication, you must set up multiple connector-va virtual machines.

Image

Depending on the type of authentication, you deploy a new connector-va in a different way. This subject will require a new post by itself but you can find details now in the Horizon Workspace Documentation Center.

Multiple data-va
User accounts are provisioned to a specific data-va virtual machine that handles their file activity. It is recommended that each data-va virtual machine serve no more than 1000 users, so you need to scale if you have more than that. When you add a new data-va virtual machine, the new data-va virtual machine automatically becomes available from the default COS host pool. The host pool for other classes of service that are created displays the new data-va virtual machine, but it is not enabled in that COS. To use a new data-va virtual machine in the other classes of service, the administrator must modify the COS and enable the data-va virtual machine.

The first data-va virtual machine in the Horizon Workspace configuration is the master node. This node contains the metadata for the data-va virtual machine user accounts. If you create additional data-va virtual machines, these data-va virtual machines are file stores only. When the master node is down, users cannot log in to their data accounts.

You can configure the host pool in the COS to use specific data-va virtual machines. In this way, you can manage where accounts are provisioned. For example, you add a second data-va virtual machine because disk space on the first data-va virtual machine is low. You do not want the first data-va virtual machine to be provisioned with any more new accounts once you have added the second node. From the Horizon Workspace Administrator Web interface, edit each COS to select the new data-va virtual machine in the Host Pool and deselect the other data-va virtual machine.

The specific command to add a data-va is as follows:

hznAdminTool addvm –type=DATA --ip="new VM ip address"


Note: Don’t forget to configure preview on each data-va.

Now the new data-va is in maintenance mode, to complete adding a new data-va do the following:

  • Restart each existing data-va
  • Log in to each data-va virtual machine as the root user to generate ssh keys
  • Reboot each data-va

The on each data-va:

su - zimbra
/opt/zimbra/.ssh/authorized_keys/zmupdateauthkeys
/etc/rc.d/memcached restart

Now go to https://ConfiguratorHostname and click “Exit Maintenance Mode”.

The new data-va virtual machine is ready to use.

Update: In Horizon Workspace 1.5 the base snapshot of the data-va is not used anymore to create other data-va. In order to create more data-va you have to create a “New datava-template Virtual Machine”.

Disclaimer: In this article i pasted parts of the official documentation.
Configuring data-va Preview

When using files in your Horizon Workspace Data section you can have a nice preview of the most common file types, like Microsoft Office, PDF, Text Files and such.

File previews can be generated in 2 ways:

  • Using LibreOffice Preview: File previews are generated on the data-va. This is a free option.
  • Using Microsoft Windows Preview: You can use this method to have a Microsoft Windows server act as a preview server. It requires Microsoft Office licenses.

Even if with the second option gives you the best compatibility, i go for the first option 99% of the times.

Enabling the LibreOffice Preview is a piece of cake: just ssh to the data-va, get a root prompt and then type:

cd /opt/zimbra/libexec
./libreoffice-installer.sh

This will download and install the software altogether. If you want to see progress of the process just do the following:

tail -f /tmp/libreoffice.download.txt

Once the process is complete do the following to apply the change:

su - zimbra
zmmailboxdctl restart

Now you should be able to use preview in Horizon Workspace.

Note: Password protected Microsoft Office documents cannot be previewed.

Adding NFS Storage to the Data Virtual Appliance

Note: If you are using Horizon Workspace 1.5 check the notes at the end of the post.

Before letting users add their files in Horizon Workspace it is important to dedicate enough storage space.

To add space to the data-va you have 2 options:

  • Add a larger VMDK
  • Add an NFS mount

Since it’s not advisable to go the VMDK way if you have more than 6TB of data, i always like to use NFS mount. Another reason is that files won’t be sitting in the data-va so whatever happens to that virtual machine we don’t have to worry about data.

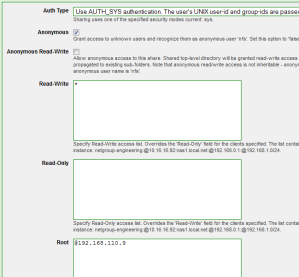
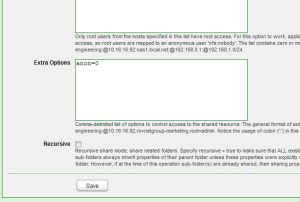
In my lab environment i use Nexenta as primary mean of storage for all needs, including VMware datastore, so i just added another share to export via NFS to use with the data-va:

1

2

I added the data-va IP address as root access for the share and also added the Extra Option “anon=0”,

SSH to the data-va with the user ‘sshuser’:

su -
cd /opt/vmware-hdva-installer/bin
./mount-nfs-store.pl --nfs 192.168.110.15:/volumes/vsphere_01/data-va

Note: “192.168.110.9” is my data-va interface on the Nexenta network segment while “192.168.110.15” is my Nexenta interface and “/volumes/vsphere_01/data-va” is the folder path of my NFS export on Nexenta.

You should get an output like this:

NFS: 192.168.110.15:/volumes/vsphere_01/data-va
HOST: 192.168.110.15
192.168.110.15 is alive.
mount.nfs: timeout set for Wed Jul 31 11:47:39 2013
mount.nfs: trying text-based options 'hard,rsize=32768,wsize=32768,intr,addr=192.168.110.15'
mount.nfs: prog 100003, trying vers=3, prot=6
mount.nfs: trying 192.168.110.15 prog 100003 vers 3 prot TCP port 2049
mount.nfs: prog 100005, trying vers=3, prot=17
mount.nfs: trying 192.168.110.15 prog 100005 vers 3 prot UDP port 33327
192.168.110.15:/volumes/vsphere_01/data-va on /opt/zimbra/store29 type nfs (rw,sync,noatime,hard,rsize=32768,wsize=32768,intr)
Error occurred: directory does not exist or is not writable: /opt/zimbra/store29
zmvolume failed at ./mount-nfs-store.pl line 49.

You see an error? Well, it’s kind of normal. I don’t know why but this script always fails at the same point. After a while and with the help of VMTN Community i figured out where it fails and how to manually finish the job.

Let’s first check that at least the NFS is mounted:

df -h

Filesystem Size Used Avail Use% Mounted on
/dev/sda3 39G 1.9G 35G 5% /
udev 2.0G 152K 2.0G 1% /dev
tmpfs 2.0G 0 2.0G 0% /dev/shm
/dev/sda1 128M 21M 101M 17% /boot
/dev/mapper/zimbra_vg-zimbra 9.9G 1.1G 8.3G 12% /opt/zimbra
/dev/mapper/store_vg-store 9.9G 151M 9.2G 2% /opt/zimbra/store
/dev/mapper/db_vg-db 30G 1.2G 27G 5% /opt/zimbra/db
/dev/mapper/index_vg-index 9.9G 151M 9.2G 2% /opt/zimbra/index
/dev/mapper/redolog_vg-redolog 12G 159M 12G 2% /opt/zimbra/redolog
/dev/mapper/log_vg-log 9.9G 153M 9.2G 2% /opt/zimbra/log
/dev/mapper/backup_vg-backup 20G 174M 19G 1% /opt/zimbra/backup
/dev/mapper/data_vg-data 30G 173M 28G 1% /opt/zimbra/data
192.168.110.15:/volumes/vsphere_01/data-va 87G 32K 87G 1% /opt/zimbra/store29

Let’s change permission on the mount point so the zimbra user can write on the path:

chown -R zimbra:zimbra /opt/zimbra/store29
su - zimbra -c 'zmvolume -l'

The output would be something similar to this:

Volume id: 1
name: message1
type: primaryMessage
path: /opt/zimbra/store
compressed: false
current: false

Volume id: 2
name: index1
type: index
path: /opt/zimbra/index
compressed: false
current: true

Volume id: 3
 name: store78
 type: primaryMessage
 path: /opt/zimbra/store29
 compressed: false
 current: true

If you see “type: primaryMessage” and “current: true” for the mount point of the NFS mount then you are good to go, the new path is the primary storage for files.

You might find yourself with the NFS share mounted but with the missing entry in the output of the command ‘zmvolume -l’; in that case after changing the permissions we create the entry manually:

su - zimbra -c 'zmvolume -a -n store78 -t primaryMessage -p /opt/zimbra/store29 --compress false'
su - zimbra -c 'zmvolume -l | tail -7 | head -1 | cut -f2 -d:'
su - zimbra -c 'zmvolume -sc -id 3'
su - zimbra -c 'zmvolume -l'

The output now should look like the above one. Let me explain the above commands:

  • ‘zmvolume -a -n store78 -t primaryMessage -p /opt/zimbra/store29 –compress false’ : Creates an uncompressed store of type primaryMessage on the NFS mount point;
  • ‘zmvolume -l | tail -7 | head -1 | cut -f2 -d:’ : Finds the ID of the store we just created;
  • ‘zmvolume -sc -id 3’ : Sets the newly created storage as current using the store id (3 in my case);

Now files added by users to the data-va should be written on the NFS share.

Take a look at the CLI Command for Horizon Workspace Data Guide for more info on data-va commands.

8/7/13 UPDATE1: I fixed some IP addresses and paths in the outputs that don’t match my configuration. I have 2 labs and i seem to have taken a part of them in one lab and a part in another. Sorry for the inconvenience.

8/7/13 UPDATE2: It would seem like they fixed the script to mount the NFS share in Horizon Workspace version 1.5 since i used it to mount an NFS share in my lab today and i had no issue at all.