Building vSphere Integrated Containers from source

In the last blog post we I introduced vSphere Integrated Containers or VIC but to be quick and simple I used binaries from Bintray instead of building it from source.

If you want to build from source it’s pretty simple, just go to the GitHub page and clone the repo, the “README.md” file will give you all the info you need.

I’ll be using the same PhotonOS VM I used in my previous post:

tdnf install git -y
git clone https://github.com/vmware/vic
cd vic
cat README.md

The best way to do this is to take advantage of the containerized approach that will spin off a container with all the prerequisites packages to build the VIC executables so that you don’t have to install them, plus this won’t modify your system at all so a pretty clean way to take.

systemctl enable docker
systemctl start docker
docker run -v $(pwd):/go/src/github.com/vmware/vic -w /go/src/github.com/vmware/vic golang:1.7 make all

A pretty long out will follow and I have no intention to paste the whole thing here, just follow the instructions if you care to see it 🙂

Just keep in mind that if you don’t give your VM enough RAM the build process will fail because gcc is not capable of allocating enough memory; my VM had 2 GB of RAM and that was good enough.

The build process takes only a few minutes to complete.

After that you can find the executables in the “bin” folder and from there you can use the commands of my previous post.

cd bin
./vic-machine-linux create --target administrator@vsphere.local:password@vcenterFQDN/Datacenter --tls-cname vch --image-store astore --public-network LAN --bridge-network Docker-Bridge --no-tlsverify --force
./vic-machine-linux delete --target administrator@vsphere.local:password@vcenterFQDN/Datacenter --force


vSphere Integrated Containers

So you have been playing with containers for a while now using Docker but once you start having several containers running in many VMs you find it difficult to manage or even remember which container runs on which VM.

VMware answer to this problem is called vSphere Integrated Containers (or VIC).

With VIC your Docker Hosts (the VMs that are running the containers) will not be a blackbox anymore but they will be capable of showing up like VMs in your vCenter server, exposing every property a VM holds.

You can get VIC here: https://vmware.github.io/vic/ but you will need to build it from source.

Otherwise you can download the binaries from Bintray: https://bintray.com/vmware/vic/

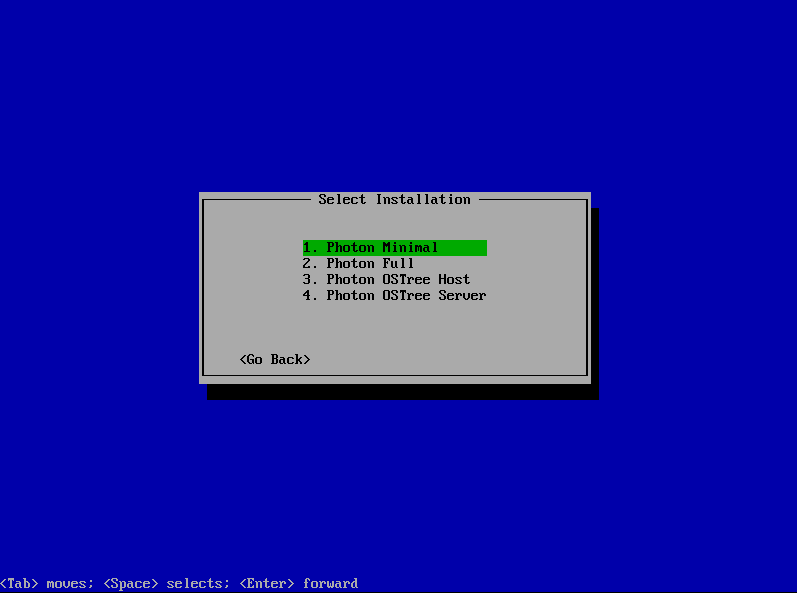
I will use the template I created in a previous post to deploy and manage VIC on my vCenter.

Deploying from template doesn’t seem to work with PhotonOS so the customizations will need to be handled manually, so I just cloned the VM into a new VM with the name of “VIC”.

Let’s customize our PhotonOS:

vi /etc/hostname # edit hostname
cd /etc/systemd/network/
cp 10-dhcp-en.network 10-static-en.network
vi 10-static-en.network # set static ip address as follows
[Match]
Name=eth0

[Network]
Address=192.168.110.11/24
Gateway=192.168.110.254
DNS=192.168.110.10
chmod 644 10-static-en.network
systemctl restart systemd-networkd
tdnf install tar wget -y
wget https://bintray.com/vmware/vic/download_file?file_path=vic_0.8.0.tar.gz
mv download_file\?file_path\=vic_0.8.0.tar.gz vic_0.8.0.tar.gz
tar xzvf vic_0.8.0.tar.gz

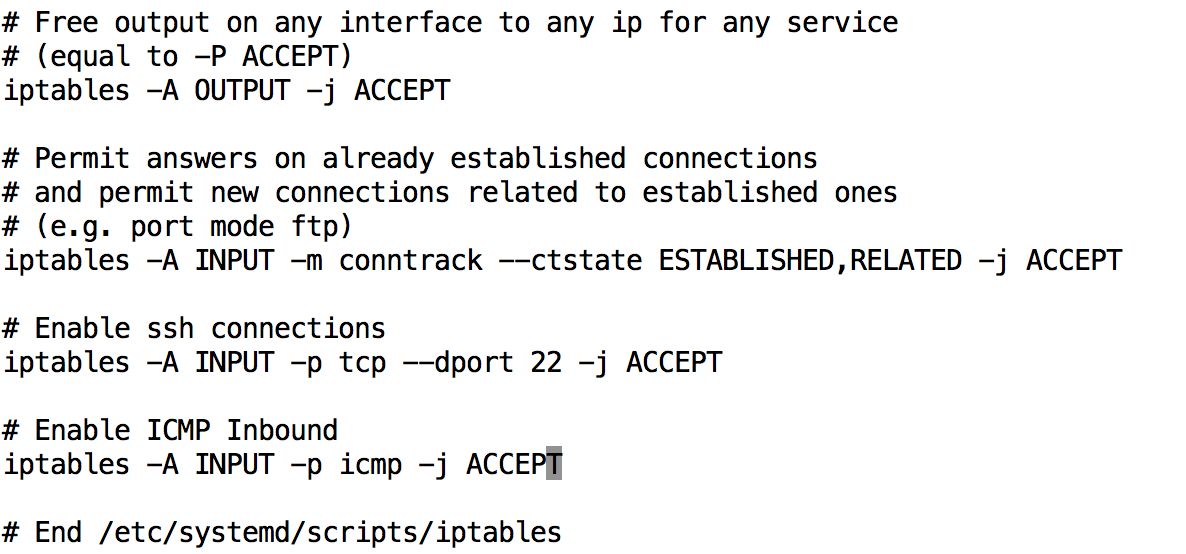
Now SSH to each ESXi host that will run VIC and add a firewall rule so that VIC will not get blocked:

vi /etc/vmware/firewall/vch.xml
<!-- Firewall configuration information -->
<ConfigRoot>
<service id='0042'>
<id>VCH</id>
<rule id='0000'>
<direction>outbound</direction>
<protocol>tcp</protocol>
<porttype>dst</porttype>
<port>2377</port>
</rule>
<enabled>true</enabled>
<required>true</required>
</service>
</ConfigRoot>
esxcli network firewall refresh
esxcli network firewall ruleset list

You should be able to see a rule called “VCH” enabled.

Now you have to create a Virtual Distributed PortGroup, I called mine “Docker-Bridge”.

Back on the VIC virtual machine you should change directory to the VIC extracted executables:

cd vic/
./vic-machine-linux create --target administrator@vsphere.local:password@vcenterFQDN/Datacenter --tls-cname vch --image-store vsanDatastore --public-network LAN --bridge-network Docker-Bridge --no-tlsverify --force

Since I’m using selft signed certificates in my lab I had to work around some certificates checking problems:
–tls-noverify: Disables client side certificates for authentication
–force: Disables check for the destination vCenter, otherwise you would need the certificate thumbprint

You should get an output similar to this:

INFO[2016-12-24T18:27:47Z] ### Installing VCH ####
WARN[2016-12-24T18:27:47Z] Using administrative user for VCH operation - use --ops-user to improve security (see -x for advanced help)
INFO[2016-12-24T18:27:47Z] Loaded server certificate virtual-container-host/server-cert.pem
WARN[2016-12-24T18:27:47Z] Configuring without TLS verify - certificate-based authentication disabled
INFO[2016-12-24T18:27:47Z] Validating supplied configuration
INFO[2016-12-24T18:27:47Z] vDS configuration OK on "Docker-Bridge"
INFO[2016-12-24T18:27:47Z] Firewall status: ENABLED on "/Datacenter/host/Cluster/esxi.vmware.lab"
INFO[2016-12-24T18:27:47Z] Firewall configuration OK on hosts:
INFO[2016-12-24T18:27:47Z] "/Datacenter/host/Cluster/esxi.vmware.lab"
INFO[2016-12-24T18:27:47Z] License check OK on hosts:
INFO[2016-12-24T18:27:47Z] "/Datacenter/host/Cluster/esxi.vmware.lab"
INFO[2016-12-24T18:27:47Z] DRS check OK on:
INFO[2016-12-24T18:27:47Z] "/Datacenter/host/Cluster/Resources"
INFO[2016-12-24T18:27:47Z]
INFO[2016-12-24T18:27:47Z] Creating virtual app "virtual-container-host"
INFO[2016-12-24T18:27:47Z] Creating appliance on target
INFO[2016-12-24T18:27:47Z] Network role "management" is sharing NIC with "client"
INFO[2016-12-24T18:27:47Z] Network role "public" is sharing NIC with "client"
INFO[2016-12-24T18:27:49Z] Uploading images for container
INFO[2016-12-24T18:27:49Z] "bootstrap.iso"
INFO[2016-12-24T18:27:49Z] "appliance.iso"
INFO[2016-12-24T18:27:55Z] Waiting for IP information
INFO[2016-12-24T18:28:06Z] Waiting for major appliance components to launch
INFO[2016-12-24T18:28:06Z] Checking VCH connectivity with vSphere target
INFO[2016-12-24T18:28:06Z] vSphere API Test: https://vcenter.vmware.lab vSphere API target responds as expected
INFO[2016-12-24T18:28:09Z] Initialization of appliance successful
INFO[2016-12-24T18:28:09Z]
INFO[2016-12-24T18:28:09Z] VCH Admin Portal:
INFO[2016-12-24T18:28:09Z] https://192.168.110.57:2378
INFO[2016-12-24T18:28:09Z]
INFO[2016-12-24T18:28:09Z] Published ports can be reached at:
INFO[2016-12-24T18:28:09Z] 192.168.110.57
INFO[2016-12-24T18:28:09Z]
INFO[2016-12-24T18:28:09Z] Docker environment variables:
INFO[2016-12-24T18:28:09Z] DOCKER_HOST=192.168.110.57:2376
INFO[2016-12-24T18:28:09Z]
INFO[2016-12-24T18:28:09Z] Environment saved in virtual-container-host/virtual-container-host.env
INFO[2016-12-24T18:28:09Z]
INFO[2016-12-24T18:28:09Z] Connect to docker:
INFO[2016-12-24T18:28:09Z] docker -H 192.168.110.57:2376 --tls info
INFO[2016-12-24T18:28:09Z] Installer completed successfully

Now you can query the Docker API endpoint, in my case:

docker -H 192.168.110.57:2376 --tls info

If you see this you are good to go:

Containers: 0
Running: 0
Paused: 0
Stopped: 0
Images: 0
Server Version: v0.8.0-7315-c8ac999
Storage Driver: vSphere Integrated Containers v0.8.0-7315-c8ac999 Backend Engine
VolumeStores:
vSphere Integrated Containers v0.8.0-7315-c8ac999 Backend Engine: RUNNING
VCH mhz limit: 10376 Mhz
VCH memory limit: 49.85 GiB
VMware Product: VMware vCenter Server
VMware OS: linux-x64
VMware OS version: 6.0.0
Plugins:
Volume:
Network: bridge
Swarm:
NodeID:
Is Manager: false
Node Address:
Security Options:
Operating System: linux-x64
OSType: linux-x64
Architecture: x86_64
CPUs: 10376
Total Memory: 49.85 GiB
Name: virtual-container-host
ID: vSphere Integrated Containers
Docker Root Dir:
Debug Mode (client): false
Debug Mode (server): false
Registry: registry-1.docker.io


You might get an error similar to “Error response from daemon: client is newer than server (client API version: 1.24, server API version: 1.23)”, this is because the docker client installed in PhotonOS can be newer than the Docker API endpoint.

You can fix this setting the client version to a previous one:

echo "export DOCKER_API_VERSION=1.23" >> ~/.bash_profile
source ~/.bash_profile

If you try again now you should be good.

You can run standard Docker commands using the API endpoint we just created, so for example we can run Apache in a container like so:

docker -H 192.168.110.57:2376 --tls run -d --name "Apache" -p 80:80 httpd
docker -H 192.168.110.57:2376 --tls ps

screen-shot-2016-12-24-at-19-40-36

If we try to point a browser to “192.168.110.57”:

screen-shot-2016-12-24-at-19-43-07

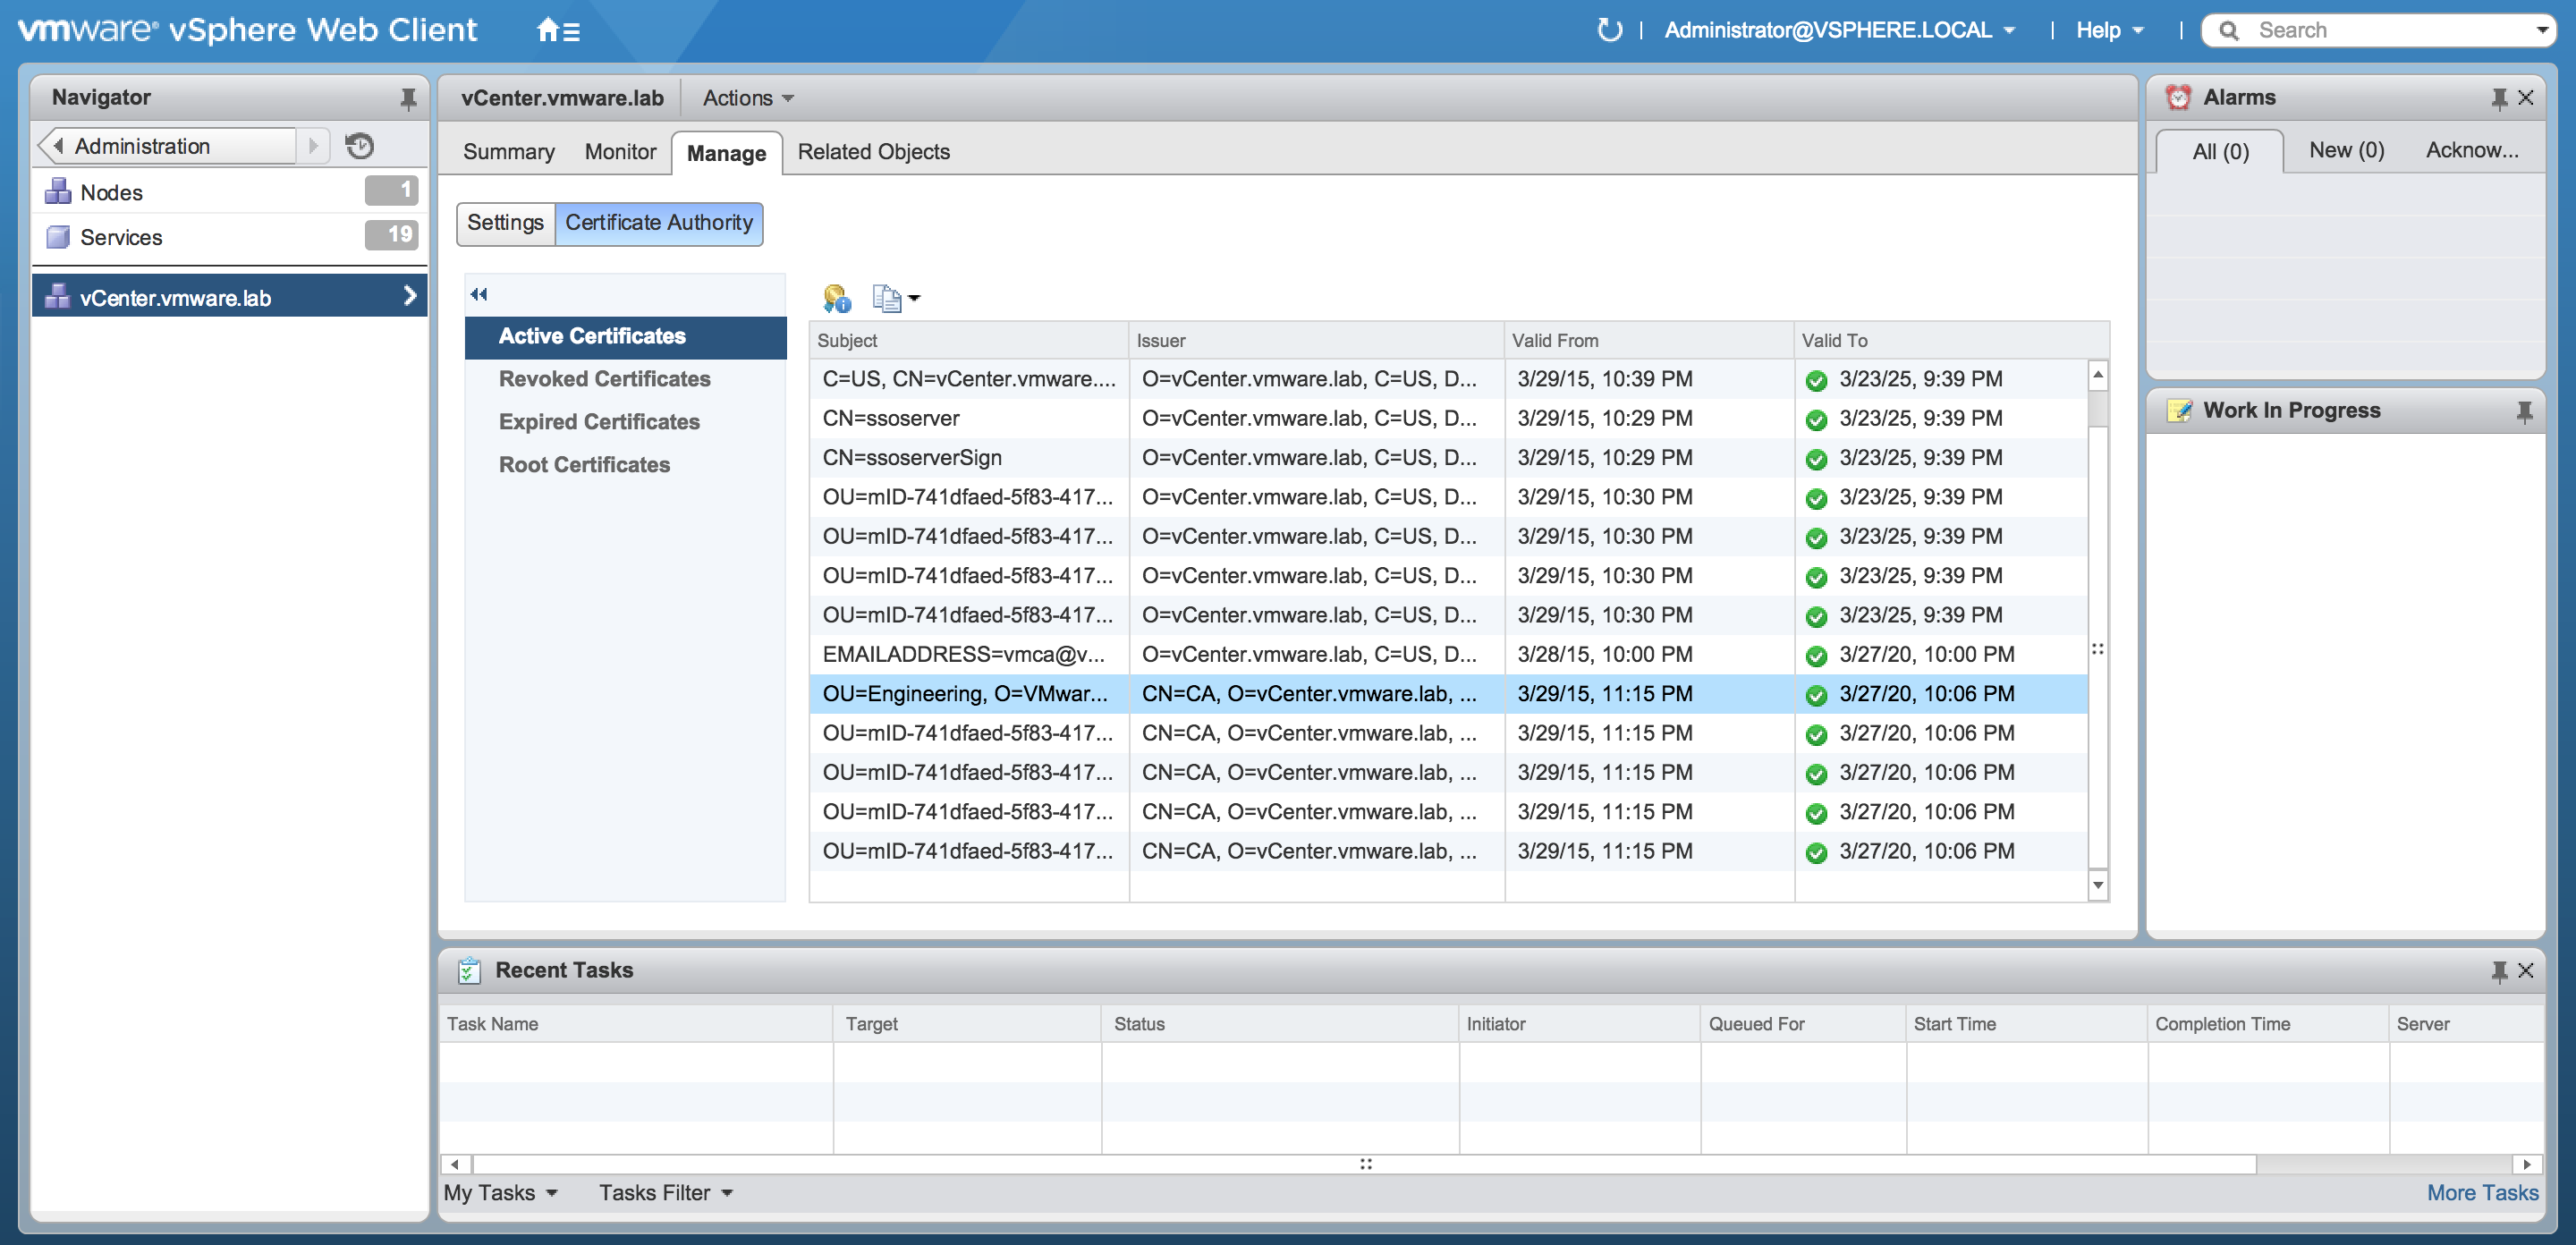
Let’s take a look at vCenter to see what has been created:

screen-shot-2016-12-24-at-19-44-13

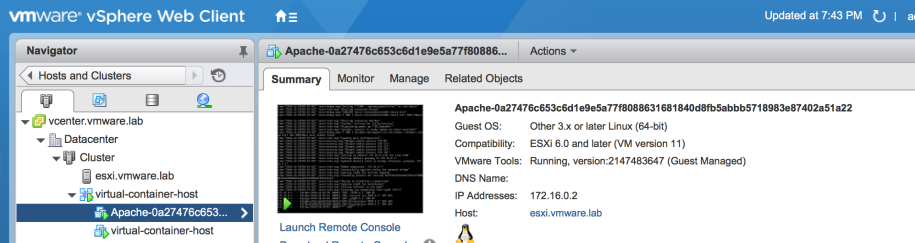
You can see the Docker API endpoint represented by the VM called “virtual-container-host” but also the container itself!

As you can see we have information about what is running, the container ID, the internal container IP Address etc.

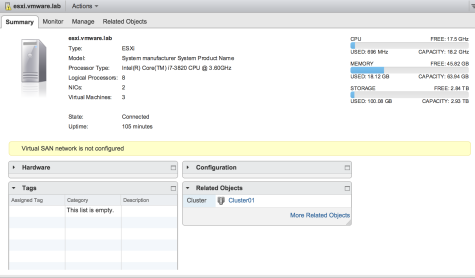
You can even go ahead and edit the virtual hardware like if it was a VM!

screen-shot-2016-12-24-at-19-47-06

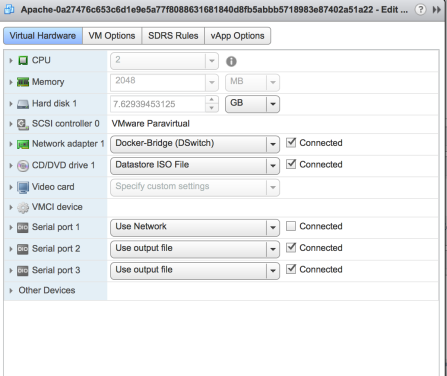
Notice how it’s using the vdPortGroup that we created earlier.

To clean up:

docker -H 192.168.110.53:2376 --tls stop Apache
./vic-machine-linux delete --target administrator@vsphere.local:fidelio@vcenter.vmware.lab/Datacenter --force

And this is the coolest way ever to use containers with vSphere!

Note: Just remember that since a vdPortGroup is mandatory this means you need vdSwitch and so you must be running Enterprise Plus edition of vSphere.

Update: VIC is now GA with vSphere 6.5 for all Enterprise Plus users.

Are you starting or advancing your career in IT?

When Neil asked me a piece of advice on the subject I was just having conversations with customers on how will our world change in the near future.

A lot of these conversations are based on the introduction of conteinerized applications and this is what I am going to write as soon as I have enough time, hopefully soon enough.

Anyway Neil did a tremendous job in collecting opinions from experienced field engineers and IT experts so if you want to read what I answered him and what many others had to say go check his blog: http://www.flackbox.com/best-it-career-advice/

I think we should thank Neil for this huge source of information that is useful for everybody, not only newcomers in the IT field.

Cloud Native Applications and VMware

After quite a bit of radio silence I’m going to write about Cloud Native Applications and VMware approach to those.
After spending some time looking into container technologies with open source software it’s nice to see that VMware is jumping on the boat by adding their enterprise vision which is probably the missing part compared to other solutions.
I will start by preparing a template for all the services that I will install and I will do it the VMware way by using PhotonOS which I intend to use as proof of concept for vSphere Integrated Containers (VIC), Photon Controller, Harbor and Admiral.
PhotonOS is a lightweight operating system written just for running containerized applications and such; I have to say that after getting familiar with it I quite like its simplicity and quick approach to all day to day activities.
First thing first, you have to choose your deployment type, there are a few:

screen-shot-2016-12-15-at-13-46-27

I won’t describe the process as it’s pretty straightforward, I’ll just say that I manually installed PhotonOS with the ISO choosing the Minimal install option.

After installing we need the IP address and we also need to enable root to ssh into the box:

ip add     # show ip address info
vi /etc/ssh/sshd_config     # PermitRootLogin = yes
systemctl restart sshd     # restart ssh deamon

Then ssh as root and continue:

mkdir .ssh
echo "your_key" >> .ssh/authorized_keys
tdnf check-update
open-vm-tools.x86_64 10.0.5-12.ph1 photon-updates
nss.x86_64 3.25-1.ph1 photon-updates
shadow.x86_64 4.2.1-8.ph1 photon-updates
linux.x86_64 4.4.8-8.ph1 photon-updates
python-xml.x86_64 2.7.11-5.ph1 photon-updates
docker.x86_64 1.11.2-1.ph1 photon-updates
systemd.x86_64 228-25.ph1 photon-updates
python2-libs.x86_64 2.7.11-5.ph1 photon-updates
python2.x86_64 2.7.11-5.ph1 photon-updates
procps-ng.x86_64 3.3.11-3.ph1 photon-updates
filesystem.x86_64 1.0-8.ph1 photon-updates
openssl.x86_64 1.0.2h-3.ph1 photon-updates
systemd.x86_64 228-26.ph1 photon-updates
systemd.x86_64 228-30.ph1 photon-updates
python2-libs.x86_64 2.7.11-7.ph1 photon-updates
python-xml.x86_64 2.7.11-7.ph1 photon-updates
python2.x86_64 2.7.11-7.ph1 photon-updates
curl.x86_64 7.47.1-3.ph1 photon-updates
pcre.x86_64 8.39-1.ph1 photon-updates
openssl.x86_64 1.0.2h-5.ph1 photon-updates
openssh.x86_64 7.1p2-4.ph1 photon-updates
openssl.x86_64 1.0.2j-1.ph1 photon-updates
iptables.x86_64 1.6.0-5.ph1 photon-updates
systemd.x86_64 228-31.ph1 photon-updates
initramfs.x86_64 1.0-4.1146888.ph1 photon-updates
glibc.x86_64 2.22-9.ph1 photon-updates
open-vm-tools.x86_64 10.0.5-13.ph1 photon-updates
rpm.x86_64 4.11.2-11.ph1 photon-updates
linux.x86_64 4.4.26-1.ph1 photon-updates
initramfs.x86_64 1.0-5.11330561.ph1 photon-updates
python2.x86_64 2.7.11-8.ph1 photon-updates
curl.x86_64 7.47.1-4.ph1 photon-updates
bzip2.x86_64 1.0.6-6.ph1 photon-updates
tzdata.noarch 2016h-1.ph1 photon-updates
expat.x86_64 2.2.0-1.ph1 photon-updates
python2-libs.x86_64 2.7.11-8.ph1 photon-updates
python-xml.x86_64 2.7.11-8.ph1 photon-updates
docker.x86_64 1.12.1-1.ph1 photon-updates
cloud-init.x86_64 0.7.6-12.ph1 photon-updates
bridge-utils.x86_64 1.5-3.ph1 photon-updates
linux.x86_64 4.4.31-2.ph1 photon-updates
systemd.x86_64 228-32.ph1 photon-updates
curl.x86_64 7.51.0-1.ph1 photon-updates
initramfs.x86_64 1.0-5.11343362.ph1 photon-updates
cloud-init.x86_64 0.7.6-13.ph1 photon-updates
open-vm-tools.x86_64 10.1.0-1.ph1 photon-updates
initramfs.x86_64 1.0-5.11353601.ph1 photon-updates
cloud-init.x86_64 0.7.6-14.ph1 photon-updates
vim.x86_64 7.4-6.ph1 photon-updates
linux.x86_64 4.4.35-1.ph1 photon-updates
libtasn1.x86_64 4.7-3.ph1 photon-updates
tdnf upgrade -y
Upgrading:
vim x86_64 7.4-6.ph1 1.93 M
tzdata noarch 2016h-1.ph1 1.52 M
systemd x86_64 228-32.ph1 28.92 M
shadow x86_64 4.2.1-8.ph1 3.85 M
rpm x86_64 4.11.2-11.ph1 4.28 M
python2 x86_64 2.7.11-8.ph1 1.82 M
python2-libs x86_64 2.7.11-8.ph1 15.30 M
python-xml x86_64 2.7.11-8.ph1 318.67 k
procps-ng x86_64 3.3.11-3.ph1 1.04 M
pcre x86_64 8.39-1.ph1 960.35 k
openssl x86_64 1.0.2j-1.ph1 5.23 M
openssh x86_64 7.1p2-4.ph1 4.23 M
open-vm-tools x86_64 10.1.0-1.ph1 2.45 M
nss x86_64 3.25-1.ph1 3.87 M
libtasn1 x86_64 4.7-3.ph1 161.48 k
iptables x86_64 1.6.0-5.ph1 1.46 M
linux x86_64 4.4.35-1.ph1 44.76 M
initramfs x86_64 1.0-5.11353601.ph1 11.49 M
glibc x86_64 2.22-9.ph1 50.97 M
filesystem x86_64 1.0-8.ph1 7.14 k
expat x86_64 2.2.0-1.ph1 242.58 k
docker x86_64 1.12.1-1.ph1 82.59 M
curl x86_64 7.51.0-1.ph1 1.24 M
cloud-init x86_64 0.7.6-14.ph1 1.93 M
bzip2 x86_64 1.0.6-6.ph1 1.65 M
bridge-utils x86_64 1.5-3.ph1 36.61 k

Total installed size: 272.23 M

Downloading:
bridge-utils 19201 100%
bzip2 526008 100%
cloud-init 509729 100%
curl 898898 100%
docker 25657821 100%
expat 92851 100%
filesystem 16357 100%
glibc 19396323 100%
initramfs 11983289 100%
linux 18887362 100%
iptables 416848 100%
libtasn1 98060 100%
nss 1591172 100%
open-vm-tools 912998 100%
openssh 1853448 100%
openssl 3192392 100%
pcre 383441 100%
procps-ng 458368 100%
python-xml 86471 100%
python2-libs 5651168 100%
python2 741755 100%
rpm 1761294 100%
shadow 2002202 100%
systemd 11856941 100%
tzdata 633502 100%
vim 1046120 100%
Testing transaction
Running transaction
Creating ldconfig cache

Complete!

After that I rebooted since the “linux” package was updated and that stands for the kernel version.
You can check the kernel version loaded with:

uname -a

More customizations:

vi /boot/grub2/grub.cfg     # edit "set timeout=1"
iptables --list     # show iptables config which by defaults allows only SSH inbound
vi /etc/systemd/scripts/iptables     # edit iptables config file

I like to enable ICMP inbound, you can find the rule I added as the last one before the end of file:

iptables_config_file

systemctl restart iptables
iptables --list     # check running configuration includes ICMP inbound
systemctl enable docker     # enable docker loaded at boot

In coming days I will follow up with VIC, Photon Controller, Harbor and Admiral using this PhotonOS VM as template.

vExpert 2016 Award

VMW-LOGO-vEXPERT-2016-k

Thanks to VMware for confirming my vExpert!

Dear old ESXTOP aka How to schedule ESXTOP batch mode

Recently I had to record a night activity of a specific VM running on a specific host for troubleshooting reasons because vCenter data wasn’t just enough for that.

Using a number of blog posts around from Duncan Epping and others (it was many, I don’t even have the links anymore) I’ve put up my personal guide about how to take over this task because every time it’s like I have to start from scratch so I decided to document it.

First thing I created a script with the specific run time and collection data I needed:

vi <path>/record-esxtop.sh
esxtop -b -a -d 2 -n 3600 > /esxtopoutput.csv

OR

esxtop -b -a -d 2 -n 3600 | gzip -9c > /esxtopoutput.csv.gz

(-d=sampling rate, -n=number of iterations; the total run time is “d*n” in seconds)
(second version creates a zipped version of the output)

Let’s make this script executable:

chmod +x <path>/record-esxtop.sh

Then, since in latest versions of ESXi there is no crontab, you’ll need to edit the cron file for the user you want to run the script with:

vi /var/spool/cron/crontabs/root

Then add a line similar to this:

30 4 * * * <path>/record-esxtop.sh

Now kill crond and reload:

cat /var/run/crond.pid
ps | grep 
kill -HUP 
ps | grep 
/usr/lib/vmware/busybox/bin/busybox crond
cat /var/run/crond.pid
ps | grep 

Now your script will get executed and you’ll find a file with your data, but how to read it?
It’s dead simple, just open PerfMon on Windows, clear all running counters then right-click on “Performance Monitor” and in the tab “Sources” add your CSV file (need to unpack it first); in the data tab you will then be able to choose metrics and VMs you want to add to your graph.

It would be nice to have a tool that does the same on Mac but I couldn’t find one and I had to use a Windows VM; if you know a Mac alternative for PerfMon please add a comment.

This procedure is supported by VMware as per KB 103346.

How to backup, restore and schedule vCenter Server Appliance vPostgres Database

Now that we are moving away from SQL Express in favor of vPostgres for vCenter simple install on Windows and since vPostgres is the default database engine for (not so simple) install of vCSA I thought it would be nice to learn how to backup and restore this database.

Since it’s easier to perform these tasks on Windows and since there are already many guides on the Internet I will focus on vCSA because I think that more and more production environment (small and big) will be using vCSA since now it’s just as functional as vCenter if not more. (more on this in another post…)

You will find all instructions for both Windows and vCSA versions of vCenter on KB2091961, but more important than that you will find there also the python scripts that will work all the magic for you so grab the “linux_backup_restore.zip” file and copy it to the vCSA:

scp linux_backup_restore.zip root@<vcenter>:/tmp

For the copy to work you must have previously changed the shell configuration for the root user in “/etc/passwd” from “/bin/appliancesh” to “/bin/bash”

Then:

unzip linux_backup_restore.zip
chmod +x backup_lin.py
mkdir /tmp/linux_backup_restore/backups
python /tmp/linux_backup_restore/backup_lin.py -f /tmp/linux_backup_restore/backups/VCDB.bak

All you will see when the backup is completed is:

Backup completed successfully.

You should see the backup file now:

vcenter:/tmp/linux_backup_restore/backups # ls -lha
total 912K
drwx------ 2 root root 4.0K Jun 3 19:41 .
drwx------ 3 root root 4.0K Jun 3 19:28 ..
-rw------- 1 root root 898K Jun 3 19:29 VCDB.bak

At this point I removed a folder in my vCenter VM and Templates view, then I logged off the vSphere WebClient and started a restore:

service vmware-vpxd stop
service vmware-vdcs stop
python /tmp/linux_backup_restore/restore_lin.py -f /tmp/linux_backup_restore/backups/VCDB.bak
service vmware-vpxd start
service vmware-vdcs start

I logged back in the WebClient and my folder was back, so mission accomplished.

Now how do I schedule this thing? Using the good old crontab but before that I will write a script that will run the backup and also give a name to the backup file corresponding to the weekday so I can have a rotation of 7 days:

#!/bin/bash
_dow="$(date +'%A')"
_bak="VCDB_${_dow}.bak"
python /tmp/linux_backup_restore/backup_lin.py -f /tmp/linux_backup_restore/backups/${_bak}

I saved it as “backup_vcdb” and made it executable with “chmod +x backup_vcdb”.

Now to schedule it just run “crontab -e” and enter a single line just like this:

0 23 * * * python /tmp/linux_backup_restore/backup_vcdb

This basically means that the system will execute the script every day of every week of every year at 11pm.

After the crontab job runs you should see a new backup with a name of this sort:

vcenter:/tmp/linux_backup_restore/backups # ls -lha
total 1.8M
drwx------ 2 root root 4.0K Jun 3 19:46 .
drwx------ 3 root root 4.0K Jun 3 19:28 ..
-rw------- 1 root root 898K Jun 3 19:29 VCDB.bak
-rw------- 1 root root 900K Jun 3 19:46 VCDB_Wednesday.bak

You will also have the log files of these backups in “/var/mail/root”.

Enjoy your new backup routine 🙂

Using vCSA 6.0 as a Subordinate CA of a Microsoft Root CA

One of the nicest improvements in vSphere 6 is the ability to use the VMware Certificate Authority (VMCA) as a subordinate CA.
In most cases enterprises already have some form of PKI deployed in house and very often it is Microsoft based so I will show you how I did it with a Microsoft Enterprise CA.

I give for granted that the Microsoft PKI is already in place, in my case it is a single VM with an Enterprise Microsoft CA installed.

The vCSA should also be already be in place.

As first step I edit the certool config file but first I make a backup of the default configuration:

mkdir /root/backup
cp /usr/lib/vmware-vmca/share/config/certool.cfg /root/backup
vi /usr/lib/vmware-vmca/share/config/certool.cfg

Compile the config file with the parameters that are good for your setup then save the file and exit.

Now we have to generate a certificate request for the VMCA to pass to the Microsoft CA and there are many ways to do that, I am going to use the vSphere Certificate Manager Utility that will automatically take most steps for me:

/usr/lib/vmware-vmca/bin/certificate-manager

Screen Shot 2015-03-29 at 23.20.25
At this point I have the .csr file (/root/root_signing_cert.csr) and the private key (/root/root_signing_cert.key) so let’s feed it to the Microsoft CA as you normally would for any certificate request using the “Subordinate Certification Authority” template:

Screen Shot 2015-03-29 at 23.25.43Now you have to take the crt file in base64 format on the vCSA and also the Microsoft CA root certificate in base64 format as well; copying files with SCP will be a challenge because the root user on the vCSA by default doesn’t use the bash shell so if you want to use this method you need to edit the “/etc/passwd” and set the root user to use bash as a shell and then you can put it back as it was once you are done transferring the files.

It could be just simpler to open the certs on your computer and the connect to the vCSA via SSH and copy the content inside new files; one way or another you need to take the certificates on the vCSA, in my case they are “root_signing_cert.pem” and “cam.pem”.

Now we need to combine the two files in a chain file:

cp root_signing_cert.pem caroot.pem
cat ca.pem >> caroot.pem

If you open the “caroot.pem” file you should see a single cert file with both ca and certificate one after another.

Now we can go back to the vSphere Certificate Manager Utility to apply this certificate:

Screen Shot 2015-03-29 at 23.36.16

Since we have already edited the certool.cfg file we just have to confirm the values that the wizard proposes, just remember to enter the FQDN of the vCenter server:

Screen Shot 2015-03-29 at 23.37.18
If you have a successful outcome you can connect via browser to your vSphere Web Client and check the certificate:


Screen Shot 2015-03-29 at 23.39.59

Screen Shot 2015-03-29 at 23.40.08


As you can see now this is a trusted connection and the VMCA has released certificates for the Solution Users on behalf of the Microsoft Root CA.

You can check the active certificate in the vSphere Web Client in the Administration section:

Screen Shot 2015-03-29 at 23.42.30

In case you decide to remove the original root certificate then you will have to refresh the Security Token Service (STS) Root Certificate, and replace the VMware Directory Service Certificate following the vSphere 6 documentation.

Now the VMCA is capable of signing certificates that are valid in you PKI chain and are trusted by default in you Windows domain by all clients.


How To Deploy vCSA 6.0 with a Mac

The new vCenter Server Appliance has a new deployment model, both architectural wise and installation wise.

I wrote extensively about the architectural changes in this post, so I will focus on how to deploy it with a Mac using command line tools since if you want to use the graphical setup you need to be running Windows.

In order to do this you need the ISO file of the vCSA mounted in your Mac.

In “/Volumes/VMware VCSA/vcsa-cli-installer/mac” you will find a script called “vcsa-deploy” that requires a JSON file with all the parameters needed to deploy and configure the VCSA on your host.

You can find templates of JSON files in “/Volumes/VMware VCSA/vcsa-cli-installer/templates”, here is how I compiled mine in order to obtain a single VM with all vCenter and PSC services:

{
    "__comments":
    [
        "Sample template to deploy a vCenter Server with an embedded Platform Services Controller."
    ],

    "deployment":
    {
        "esx.hostname":"192.168.1.107",
        "esx.datastore":"vsanDatastore",
        "esx.username":"root",
        "esx.password":"12345678",
        "deployment.option":"tiny",
        "deployment.network":"LAN",
        "appliance.name":"vCenter",
        "appliance.thin.disk.mode":true
    },

    "vcsa":
    {

        "system":
        {
            "root.password":"12345678",
            "ssh.enable":true
        },

        "sso":
        {
            "password":"12345678",
            "domain-name":"vsphere.local",
            "site-name":"Default-First-Site"
        },

        "networking":
        {
            "ip.family":"ipv4",
            "mode":"static",
            "ip":"192.168.110.2",
            "prefix":"24",
            "gateway":"192.168.110.254",
            "dns.servers":"8.8.8.8",
            "system.name":"192.168.110.2"
        }
    }
}

You can see how I used the newly created “vsanDatastore” as my destination datastore.

Your SSO password will be checked against complexity compliance by the script before starting the deployment process.
Passwords are stored in clear text so make sure not to leave around this file and possibly destroy it after use or change all the passwords right after deployment.
You might have noticed that as the system name I used the IP address: I had to do this because I have no DNS (yet) and if you enter a FQDN as system name you need to make sure that it can be resolved both with forward and reverse DNS calls so I had no choice; this will actually be a limitation later on because I will not be able to add the vCSA to a Windows domain so if I want to use Windows credentials to log in my vCenter I will need to setup LDAP authentication.

You just fire this command to start the deployment:

/Volumes/VMware\ VCSA/vcsa-cli-installer/mac/vcsa-deploy vcenter60.json

During the deployment process you will see the following:

Start vCSA command line installer to deploy vCSA "vCenter60", an embedded node.

Please see /var/folders/dp/xq_5cxlx2h71cgy2t83ghkd00000gn/T/vcsa-cli-installer-9wU8aB.log for logging information.

Run installer with "-v" or "--verbose" to log detailed information.

The SSO password meets the installation requirements.
Opening vCSA image: /Volumes/VMware VCSA/vcsa/vmware-vcsa
Opening VI target: vi://root@192.168.1.107:443/
Deploying to VI: vi://root@192.168.1.107:443/

Progress: 99%
Transfer Completed
Powering on VM: vCenter60

Progress: 18%
Power On Completed

Installing services...
Progress: 5%. Setting up storage
Progress: 50%. Installing RPMs
Progress: 56%. Installed oracle-instantclient11.2-odbc-11.2.0.2.0.x86_64.rpm
Progress: 62%. Installed vmware-identity-sts-6.0.0.5108-2499721.noarch.rpm
Progress: 70%. Installed VMware-Postgres-9.3.5.2-2444648.x86_64.rpm
Progress: 77%. Installed VMware-invsvc-6.0.0-2562558.x86_64.rpm
Progress: 79%. Installed VMware-vpxd-6.0.0-2559267.x86_64.rpm
Progress: 83%. Installed VMware-cloudvm-vimtop-6.0.0-2559267.x86_64.rpm
Progress: 86%. Installed VMware-sps-6.0.0-2559267.x86_64.rpm
Progress: 87%. Installed VMware-vdcs-6.0.0-2502245.x86_64.rpm
Progress: 89%. Installed vmware-vsm-6.0.0-2559267.x86_64.rpm
Progress: 95%. Configuring the machine
Service installations succeeded.

Configuring services for first time use...
Progress: 3%. Starting VMware Authentication Framework...
Progress: 11%. Starting VMware Identity Management Service...
Progress: 14%. Starting VMware Single Sign-On User Creation...
Progress: 18%. Starting VMware Component Manager...
Progress: 22%. Starting VMware License Service...
Progress: 25%. Starting VMware Service Control Agent...
Progress: 33%. Starting VMware System and Hardware Health Manager...
Progress: 44%. Starting VMware Common Logging Service...
Progress: 55%. Starting VMware Inventory Service...
Progress: 64%. Starting VMware vSphere Web Client...
Progress: 66%. Starting VMware vSphere Web Client...
Progress: 70%. Starting VMware ESX Agent Manager...
Progress: 74%. Starting VMware vSphere Auto Deploy Waiter...
Progress: 81%. Starting VMware Content Library Service...
Progress: 85%. Starting VMware vCenter Workflow Manager...
Progress: 88%. Starting VMware vService Manager...
Progress: 92%. Starting VMware Performance Charts...
Progress: 100%. Starting vsphere-client-postinstall...
First time configuration succeeded.

vCSA installer finished deploying "vCenter60", an embedded node:
System Name: 192.168.110.20
Login as: Administrator@vsphere.local

It's time to connecto the the new Web Client, just open your browser to "https://" and then select "Log In To the vSphere Web Client".

You should now log in but before starting the normal configuration process I suggest you take care of password expiration in which present in two separate areas in this version of vCSA: the SSO users and the root system user.
About the first one you can go to Administration -> Single Sign-On -> Configuration -> Password Policy and edit the Maximum Lifetime to “0” so effectively you are disabling expiration:

Featured image

For the root user you will need to drop to the vCSA command line, enable and access the Shell the issue the following:

localhost:~ # chage -l root        # show current password expiration settings

localhost:~ # chage -M -1 root     # set expiration to Never
Aging information changed.
localhost:~ # chage -l root
Minimum: 0
Maximum: -1
Warning: 7
Inactive: -1
Last Change: Mar 17, 2015
Password Expires: Never
Password Inactive: Never
Account Expires: Never

Now you could start deploying all your VMs but if you try that you will find that vSAN will complain about a policy violation!

Do you remember how we needed to change the default policy on the host before we could deploy vCSA?
We did that at the host level but when vCSA started managing the host the default policy has been overwritten to the original defaults so now we have to change it again to match our need but this time we can leverage the GUI for this task:

Featured image

Now all is set and you should be good to go… not really!
We’ve never set a network for the vSAN traffic, even if I’m running on a single node configuration this will still trigger a warning:

Featured image

All you have to do is create a new VMKernel portgroup and flag it for vSAN traffic and your will system be again a little happy vSphere host.

Running a Home Lab on a Single vSAN Node

This is how I managed to run my lab on a single vSAN node and manage it completely Windows free, which is always a goal for a Mac user like me; with vSphere 6 this is a lot easier than it used to be in the past thanks to improvement in the Web Client (and the fact that the fat client doesn’t connect to vCenter anymore) and also thanks to the new VCSA that comes with deployment tools for Mac.
About the storage side of things, I’ve always been running my lab with some kind of virtual storage appliance in the past (Nexenta, Atlantis, Datacore) but those require a lot of memory and processing power and this reduces the number of VMs I can run in my lab simultaneously.
It’s true that I can get storage acceleration like this (which is so important in a home lab) but I sacrifice consolidation ratio and add complexity to take into account when I do upgrades and maintenance, so I decided to change my approach and include my physical lab in the process of learning vSAN.
If all goes as I would like I will get storage performance without sacrificing too many resources for it and this would be awesome.
Here is my current hardware setup in terms of disks:

1 Samsung SSD 840 PRO Series
1 Samsung SSD 830
3 Seagate Barracuda ST31000524AS 1TB 7200 RPM 32MB Cache SATA 6.0Gb/s 3.5″

I also have another spare ST31000524AS that I might add later but that would require me to add a disk controller.
Speaking of which, my current controller (C602 AHCI – Patsburg) is not in the vSAN HCL and the queue depth is listed as a pretty depressive value of 31 (per port) but I am still just running a lab and I don’t really need to achieve production grade performance numbers; nevertheless I have been looking around on eBay and it seems like with about €100 I can get a supported disk controller but I decided to wait a few weeks to make sure VMware updates the HCL just because I don’t want to buy something that won’t be on vSphere6/vSAN6 HCL plus I might still get the performance I need with my current setup, or at least this is what I hope.

UPDATE: The controller I was keeping an eye on doesn’t seem to be listed in the HCL for vSAN 6 even now that the HCL is reported to be updated so be careful with your lab purchases!

For the time being I will test this environment on my current disk controller and learn how to troubleshoot performance bottlenecks in vSAN which is going to be a great exercise anyway.

The first thing to do in my case was to decommission the current disks, so once I delete the VSA that was using them as RDM I needed to make sure that the disks had no partitions left on them since this will create problems claiming them during the vSAN setup, so I accessed my ESXi via SSH and started playing around with the command line:

esxcli storage core device list      # list block storage devices

Which gave me a list of devices that I could use with vSAN (showing one disk only):

t10.ATA_____Samsung_SSD_840_PRO_Series______________S12RNEACB06971B_____
   Display Name: Local ATA Disk (t10.ATA_____Samsung_SSD_840_PRO_Series______________S12RNEACB06971B_____)
   Has Settable Display Name: true
   Size: 244198
   Device Type: Direct-Access 
   Multipath Plugin: NMP
   Devfs Path: /vmfs/devices/disks/t10.ATA_____Samsung_SSD_840_PRO_Series______________S12RNEACB06971B_____
   Vendor: ATA     
   Model: Samsung SSD 840 
   Revision: DXM0
   SCSI Level: 5
   Is Pseudo: false
   Status: on
   Is RDM Capable: false
   Is Local: true
   Is Removable: false
   Is SSD: true
   Is VVOL PE: false
   Is Offline: false
   Is Perennially Reserved: false
   Queue Full Sample Size: 0
   Queue Full Threshold: 0
   Thin Provisioning Status: yes
   Attached Filters: 
   VAAI Status: unknown
   Other UIDs: vml.0100000000533132524e45414342303639373142202020202053616d73756e
   Is Shared Clusterwide: false
   Is Local SAS Device: false
   Is SAS: false
   Is USB: false
   Is Boot USB Device: false
   Is Boot Device: false
   Device Max Queue Depth: 31
   No of outstanding IOs with competing worlds: 32
   Drive Type: unknown
   RAID Level: unknown
   Number of Physical Drives: unknown
   Protection Enabled: false
   PI Activated: false
   PI Type: 0
   PI Protection Mask: NO PROTECTION
   Supported Guard Types: NO GUARD SUPPORT
   DIX Enabled: false
   DIX Guard Type: NO GUARD SUPPORT
   Emulated DIX/DIF Enabled: false

This is useful to identify the SSD devices, the device names and their physical path. Here’s a recap of the useful information in my environment:

/vmfs/devices/disks/t10.ATA_____Samsung_SSD_840_PRO_Series______________S12RNEACB06971B_____
/vmfs/devices/disks/t10.ATA_____SAMSUNG_SSD_830_Series__________________S0VYNYABC03672______
/vmfs/devices/disks/t10.ATA_____ST31000524AS________________________________________5VPDP87L
/vmfs/devices/disks/t10.ATA_____ST31000524AS________________________________________5VPDP8N3
/vmfs/devices/disks/t10.ATA_____ST31000524AS________________________________________9VPC5AQ9

The Samsung 840 Pro will give me much better performance in a vSAN diskgroup so I will put aside the 830 for now.

Now for each and every disk I check the presence of partitions and removed all of them if any; I’m going to show you the commands I run against one disk as an example:

~ # partedUtil getptbl /vmfs/devices/disks/t10.ATA_____ST31000524AS________________________________________5VPDP87L
gpt
121601 255 63 1953525168
1 34 262177 E3C9E3160B5C4DB8817DF92DF00215AE microsoftRsvd 0
2 264192 1953519615 5085BD5BA7744D76A916638748803704 unknown 0

~ # partedUtil delete /vmfs/devices/disks/t10.ATA_____ST31000524AS________________________________________5VPDP87L 2

~ # partedUtil delete /vmfs/devices/disks/t10.ATA_____ST31000524AS________________________________________5VPDP87L 1

~ # partedUtil getptbl /vmfs/devices/disks/t10.ATA_____ST31000524AS________________________________________5VPDP87L
gpt
121601 255 63 1953525168

partedUtil is used to manage partitions, the “getptbl” shows the partitions (2 in this case) and the delete command removes them; note how in the end of these commands I needed to specify the partition number on top of which I wanted to execute the operation.

At that point with all the disks ready I needed to change the default vSAN policy because otherwise I wouldn’t be able to satisfy the 3-nodes requirement, so I needed to enable the “ForceProvisioning” setting.
Considering that at some point vSAN will need to destage writes from SSD to HDD I also decided to enable StripeWidth and set it to “3” so I could take advantage of all of my 3 HDD when IOs involve the magnetic disks.
Please note that this is probably a good idea in a lab while in a production environment you will need to find good reasons for this since VMware encourages customers to leave the default value at “1”; problems to consider comes into play when you are doing the sizing of your environment (careful about components number even if vSAN 6 raised the per host limit from 3000 to 9000), in general your should read the “VMware Virtual SAN 6.0
Design and Sizing Guide” (http://goo.gl/BePpyI) before making any architectural decision.

To change vSAN default policy and create a cluster I made very minor changes to William Lam steps described here for vSAN 1.0:

esxcli vsan policy getdefault      # display the current settings

esxcli vsan policy setdefault -c cluster -p "((\"hostFailuresToTolerate\" i0) (\"forceProvisioning\" i1) (\"stripeWidth\" i3))"
esxcli vsan policy setdefault -c vdisk -p "((\"hostFailuresToTolerate\" i0) (\"forceProvisioning\" i1) (\"stripeWidth\" i3))"
esxcli vsan policy setdefault -c vmnamespace -p "((\"hostFailuresToTolerate\" i0) (\"forceProvisioning\" i1) (\"stripeWidth\" i3))"
esxcli vsan policy setdefault -c vmswap -p "((\"hostFailuresToTolerate\" i0) (\"forceProvisioning\" i1) (\"stripeWidth\" i3))"
esxcli vsan policy setdefault -c vmem -p "((\"hostFailuresToTolerate\" i0) (\"forceProvisioning\" i1) (\"stripeWidth\" i3))"

esxcli vsan policy getdefault      # check that the changes made are active

This is when I created the vSAN cluster comprised of one node:

esxcli vsan cluster new
esxcli vsan cluster get
Cluster Information
Enabled: true
Current Local Time: 2015-03-21T10:23:14Z
Local Node UUID: 51a90242-c628-b3bc-4f8d-6805ca180c29
Local Node State: MASTER
Local Node Health State: HEALTHY
Sub-Cluster Master UUID: 51a90242-c628-b3bc-4f8d-6805ca180c29
Sub-Cluster Backup UUID:
Sub-Cluster UUID: 52b2e982-fd0f-bc1a-46a0-2159f081c93d
Sub-Cluster Membership Entry Revision: 0
Sub-Cluster Member UUIDs: 51a90242-c628-b3bc-4f8d-6805ca180c29
Sub-Cluster Membership UUID: 34430d55-4b18-888a-00a7-74d02b27faf8

I was good to add the disks to a diskgroup now, remember that in every diskgroup there is 1 SSD and one or more HDD:

[root@esxi:~] esxcli vsan storage add -s t10.ATA_____Samsung_SSD_840_PRO_Series______________S12RNEACB06971B_____ -d t10.ATA_____ST31000524AS________________________________________5VPDP87L

[root@esxi:~] esxcli vsan storage add -s t10.ATA_____Samsung_SSD_840_PRO_Series______________S12RNEACB06971B_____ -d t10.ATA_____ST31000524AS________________________________________5VPDP8N3

[root@esxi:~] esxcli vsan storage add -s t10.ATA_____Samsung_SSD_840_PRO_Series______________S12RNEACB06971B_____ -d t10.ATA_____ST31000524AS________________________________________9VPC5AQ9

I had no errors, so I checked the vSAN storage to see what was composed of:

esxcli vsan storage list
t10.ATA_____ST31000524AS________________________________________5VPDP87L
Device: t10.ATA_____ST31000524AS________________________________________5VPDP87L
Display Name: t10.ATA_____ST31000524AS________________________________________5VPDP87L
Is SSD: false
VSAN UUID: 527ae2ad-7572-3bf7-4d57-546789dd7703
VSAN Disk Group UUID: 52e56e97-d27b-6d9b-d1fe-c73da8082ccc
VSAN Disk Group Name: t10.ATA_____Samsung_SSD_840_PRO_Series______________S12RNEACB06971B_____
Used by this host: true
In CMMDS: true
Checksum: 2442595905156199819
Checksum OK: true
Emulated DIX/DIF Enabled: false

t10.ATA_____ST31000524AS________________________________________9VPC5AQ9
Device: t10.ATA_____ST31000524AS________________________________________9VPC5AQ9
Display Name: t10.ATA_____ST31000524AS________________________________________9VPC5AQ9
Is SSD: false
VSAN UUID: 52e06341-1491-13ea-4816-c6e6338316dc
VSAN Disk Group UUID: 52e56e97-d27b-6d9b-d1fe-c73da8082ccc
VSAN Disk Group Name: t10.ATA_____Samsung_SSD_840_PRO_Series______________S12RNEACB06971B_____
Used by this host: true
In CMMDS: true
Checksum: 1139180948185469177
Checksum OK: true
Emulated DIX/DIF Enabled: false

t10.ATA_____Samsung_SSD_840_PRO_Series______________S12RNEACB06971B_____
Device: t10.ATA_____Samsung_SSD_840_PRO_Series______________S12RNEACB06971B_____
Display Name: t10.ATA_____Samsung_SSD_840_PRO_Series______________S12RNEACB06971B_____
Is SSD: true
VSAN UUID: 52e56e97-d27b-6d9b-d1fe-c73da8082ccc
VSAN Disk Group UUID: 52e56e97-d27b-6d9b-d1fe-c73da8082ccc
VSAN Disk Group Name: t10.ATA_____Samsung_SSD_840_PRO_Series______________S12RNEACB06971B_____
Used by this host: true
In CMMDS: true
Checksum: 10619796523455951412
Checksum OK: true
Emulated DIX/DIF Enabled: false

t10.ATA_____ST31000524AS________________________________________5VPDP8N3
Device: t10.ATA_____ST31000524AS________________________________________5VPDP8N3
Display Name: t10.ATA_____ST31000524AS________________________________________5VPDP8N3
Is SSD: false
VSAN UUID: 52f501d7-ac52-ffa4-a45b-5c33d62039a1
VSAN Disk Group UUID: 52e56e97-d27b-6d9b-d1fe-c73da8082ccc
VSAN Disk Group Name: t10.ATA_____Samsung_SSD_840_PRO_Series______________S12RNEACB06971B_____
Used by this host: true
In CMMDS: true
Checksum: 7613613771702318357
Checksum OK: true
Emulated DIX/DIF Enabled: false

At this point I could see my “vsanDatastore” in the vSphere Client. (I had no vCenter yet)

The next step will be to deploy vCenter on this datastore; I will be using VCSA and I will show you how to do it with a Mac.